so, i decided to make Glenn a sweater for Christmas, but all the patterns i could find were either too fluffy, too ugly, or unuseful as an actual warming device. after reviewing a large number of patterns in books and online, i ended up synthesizing a pattern of my own. the Patons yarn i used totally rocks for this and wasn't the tiniest bit itchy.
enjoy!
MATERIALS:
US Size 5 and 7 knitting needles (or size needed to match gauge)
Cable stitch holder
Worsted weight yarn, preferably natural fibers to limit risk of skin irritation: ~ 4 ounces for smaller dog, up to 8 ounces for larger dog. I recommend Paton’s Classic Merino Wool.
Gauge: 8 stitches by 14 rows = 2” x 2” on larger size needles.
Measurements:
NOTE: Before starting, you will need to record all the below measurements for your dog. Using a soft tape measure (not a ruler) applied loosely, take the below measurements and record where indicated. This will save time and stress later on.
Neck (about where the collar hits): ____
Size 1 2 3 4 5
Neck circumference 8” 10” 12” 14” 16”
Stitches to cast on 36-38 40-42 44-46 48-50 52-54
Back (from top of shoulder blade all the way to the top of the tail): ____
Chest:
Distance between front legs: ____
From thoracic inlet (pointy tip of bone in the end of the neck) to top of front leg: ____
Whole belly piece:
Male dog: From thoracic inlet to the second to last rib: ____
Female dog: From thoracic inlet to front of the back leg: ____
Front arm hole length: From front of leg to back of leg (be slightly generous): ____
Back piece:
Using smaller needles, loosely cast on ___ stitches as determined by the chart above.
Alternate K2, P2 ribbing until:
1 ½” if want short mock neck for shorter necked dog or dog needing to wear an Invisible Fence or bark collar.
3” if want mock neck for longer necked dog or short turtleneck for dog described above.
6” if want full turtleneck.
Change to larger size needles. Work in stockinette stitch, inserting cables as follows:
For sizes 1 and 2, center 2 smaller cables (4 stitches apiece) separated by 6 stitches in the right side of the piece (see below). For the larger sizes, I would recommend centering 2 larger cables (in parentheses).
Row 1 (right side): Knit.
Row 2: Purl.
Row 3: Place 2 (3) stitches on cable holder and place behind. Knit 2 (3) stitches then knit stitches off of the cable holder.
Row 4: Purl.
Continue in pattern until total length is 2" short of the correct length as measured above.
Switch to smaller size needles and knit 2" of K2, P2 ribbing used for the neck above. Cast off.
Chest piece:
Using the smaller size needles, cast on 3 stitches.
Row 2: Purl.
Row 3: K1, M2 in next stitch, K1. (5st)
Row 4: Purl.
Continue in stockinette, increasing 1 stitch on each edge of right-sided rows as follows: K2, M1, K to last 3 stitches, M1, K2.
When you reach the width indicated between the front legs, stop increasing. Work in straight stockinette until you reach 1 inch shy of the total chest length you noted above.
Work the last inch in K2, P2 ribbing as for the neck.
Work 6 stitches in ribbing and place on a stitch holder, then bind off stitches until you get to the last 6 stitches. Work these stitches in ribbing until the total length including this edge matches that of the back piece. Bind off.
Pick up 6 stitches from the stitch holder and work in ribbing until length matches other side. Bind off.
Finish work:
Sew the neck seam, remembering to sew halfway down on the right-side and switch then to the inside for a turtleneck.
Place the chest piece at the bottom of the neck rib, and sew a seam down both sides, until the chest piece length is equal to the thoracic inlet-leg measurement.
Leave an opening for the front legs equal to the length you noted above and continue the seams down each side to the bottom.
Weave in loose ends.
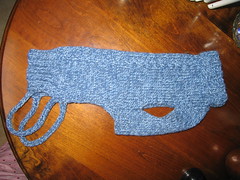
Pick up 4 stitches on the bottom of the back ribbing at the corner (see photo if confused). Knit in stockinette until stirrup is appropriate length to fasten where the ribbing started without pulling on the dog’s groin. This particular measurement should be made with the sweater on the dog.
Attach the stirrup by Ktog the stirrup stitches with the four stitches directly above the ribbing on the back piece while binding off.
Pick up four stitches on the other corner and knit other stirrup to match.
Weave in ends and block.
Options:
If in an area with high snowfall, consider picking up stitches around front leg openings and knitting in K2 P2 ribbing 1-3 inches.
Instead of knitting the neck in rib, for a polo or rugby style, knit neck in K1P1 ribbing or reverse stockinette (P on ‘right side) for 3-5 inches. Start the neck seam 1 inch from the bottom, and fold down the top to make a collar. In this case, eliminate cables and knit in stockinette in alternating large and narrow stripes of gray and blue.


1 comment:
i wish. the only pic i have of him in it in focus looks really strange. he is all sacked out comfy with Mom and the sweater is sort of twisted and riding up. we will have to depend on Mom to take a pic for us!
Post a Comment